2015年10月8日 星期四

2014年9月22日 星期一
在 Blogger 上顯示 GitHub Ribbon

首先,到 GitHub Ribbons 挑選喜歡的配色,抄下其中 src 及 data-canonical-src (非必要) 屬性。
在部落格的「版面配置」中,捲動到最後面,找到「新增小工具」,確認它是在「網誌文章」的後面,點選後,選擇「HTML/JavaScript」,然後插入下面程式碼:
記得將最後面的 home 改為你自己的 GitHub 的個人頁面,並且分別填入剛剛抄下的 src 和 data-canonical-src 到 src 及 canonicalSrc 屬性中。彩帶預設放在右邊,如果挑選的彩帶必須放在左邊,則要加上 position: 'left' 屬性。
這樣設定之後,在部落格的首頁就會出現「Fork me on GitHub」的彩帶,點擊後會連到你的 GitHub 個人首頁。
預設在文章中不顯示彩帶。若要在文章中連到個人首頁或特定的專案,只要在文章的任意 HTML 標籤中,埋入 data-forkme 屬性,即可顯示彩帶:
2014年9月20日 星期六
Lazy-umd.js - 懶人 UMD (Universal Module Definition)

最近在整理過去寫的程式庫,想要統一支援 script loader,同時又很貪心地想要:
1.同時支援 AMD(RequireJS)、CommonJS(node.js) 及 browser,解決不同語法差異。
2.模組套用時,避免修改 script loader 程式碼的需要。
研究了一下,發現 Addy Osmani 已經寫了 UMD。UMD 可以滿足第一點,但是應該是為了避免 script loader 程式碼擁腫,所以套用的時候,一定要修改 script loader 的部分。所以我自己整理出兩種做法,放在 GitHub 供大家參考:
2014年9月7日 星期日
將 SVN Local Repository 轉換為 Git Local Repository (Windows)

如果有舊專案使用 Subversion 管理程式碼,而且不是儲存在 svn server 上,而是使用 TortoiseSVN 的 create repository here 指令所建立的 repository。或者是 server 已不復存在,只剩下 repository 目錄的備份,那麼可以試著使用本文介紹的方式,轉換為 git 格式。
2014年8月5日 星期二
為什麼我要開發 Regular Expression Generator - RegexGen.js

RegexGen.js is a JavaScript Regular Expression Generator that helps to construct complex regular expressions.
如同我在 Regular Expression 學習筆記 所說明的:「學習 regular expression 的關鍵,不在於記憶簡寫符號,而是對引擎匹配原理的掌握。」最佳的 regular expression 學習方法,就是先學習正則引擎的匹配原理。想要快速查閱重點的話,可以參考前三篇學習筆記: (1), (2), (3),如果有充足的時間的話,當然還是建議詳閱 Mastering Regular Expressions 這本書。
然而,畢竟正則表達式的語法相當緊湊,想要一眼看懂複雜的表達式,幾乎是不可能的。首先必須熟悉正則表達式的 meta-character (元字元),然後一步一步拆解。雖然有 RegexBuddy 這樣的軟體可以幫忙拆解,但即使能正確的拆解,也可能無法了解作者 (通常是自己) 原本的思考邏輯,或者要避免的問題。
Regular Expression (JavaScript) 學習筆記 (3) - Informal BNF 語法
Regular Expression (JavaScript) 學習筆記 (2) - 原理篇 (下)
前言
上一篇介紹了正則引擎的基本功能與原理,接下來介紹功能更為強大的 lookaround (環視)。
Lookaround (環視) 不會佔用匹配字元
有時候,要匹配的文本主體,需要滿足的條件不只一個;或者,需要對上下文進行多重約束。
然而,對於一般的表達式而言,一旦文本匹配成功,便會由表達式所佔有;也就是說,同一段文本,絕不可能同時由兩個表達式所匹配。
另一方面,有時候,需要確保匹配的文本主體不含特定的內容,但是這個特定的內容,不是一個單一字元。在單一字元的情況下,我們可以使用否定型字元組來處理。但是在多重字元的情況下,卻很難使用一般的表達式辦到。
在這樣的需求下,許多新的 flavor (流派) 開始支援 lookaround (環視) 的功能。
對於環視表達式,最重要的特性就是,它們不會 consume (吃掉) 任何字元:不論匹配結果是否成功、不論是肯定型還是否定型、不論是順序還是逆序,引擎都會回到開始匹配前的原點,並且丟棄所有匹配的內容以及過程中儲存的備選狀態。在此之後,引擎才會根據環視表達式的匹配成功與否,進行下一個動作:當匹配成功時,引擎由目前位置繼續下一個表達式的匹配;當匹配失敗時,引擎回溯 (請參考前面回溯的說明) 到上一個儲存點 (這是由上一個表達式所儲存),繼續由上一個表達式儲存的下一個選擇進行嘗試 (或繼續回溯到上上個表達式)。
(環視使用的是一種擴展的 NFA:NFA-λ (也叫做 NFA-ε 或有 ε 移動的 NFA),它允許轉換到新狀態的變換不消耗任何輸入符號。)
可以這樣想像,lookaround (環視) 就像是站在原地不動,向前或向後觀望。依照環視檢視文本的方向,可以區分為 lookahead (順序環視) 和 lookbehind (逆序環視)。
Regular Expression (JavaScript) 學習筆記 (1) - 原理篇 (上)
前言
過去初學 regular expression 時,看了許多入門教學及參考資料,但多數資料幾乎都只是將一些表達式符號一一列出,然後再舉一些無關緊要的範例,以為這樣就可以弄懂 regular expression 了。做為初學者,看到這麼多的表達式符號,就以為 regular expression 很難學。直到看了 Mastering Regular Expressions 這本書,才知道其實是被誤導了。雖然 regular expression 提供了許多簡寫符號,但是大多數的簡寫符號多半只是為了縮短表達式的長度,這些簡寫符號只要在使用的時候查一下,實際使用過就可以熟悉了,根本不需要特別花時間記憶。其實學習 regular expression 的關鍵,不在於記憶簡寫符號,而是對引擎匹配原理的掌握。
正則表達式
正則表達式是強大、極富彈性、高效的文本處理工具。
其通用的模式表示法,具有如同迷你程式語言般的功能,賦予使用者描述和解析文本的能力。 配合上特定工具提供的支援,正則表達式能夠添加、移除、分離 (isolate)、疊加 (fold)、插入 (spindle) 和截斷 (mutilate) 各類型的文本和數據。
完整的正則表達式是由兩類不同的字元構成,特殊字元是由 *, +, ?, ^ 之類的字元構成,稱為 metacharacters (元字元),其餘的字元稱為 literal (文本字元) 或是 normal text characters (普通文字字元)。
可以把 metacharacters 想像為程式語言中的 operator (運算子),而 literal 則是 operand (運算元)。
(事實上,literal 本身也應該算是 operator: literal 中的每個字元,都代表必須匹配一個字元,而且是逐字元匹配。)
完整的正則表達式是由如上述的小的建構模塊單元組成。每個單獨的建構模塊都很簡單,過它們能夠以無窮多種方式組合,要將它們結合起來實現特殊目標,則必須依靠經驗。
2014年7月4日 星期五
Open Sourced my JavaScript Regular Expression Generator - RegexGen.js

Hi there, I've open-sourced my new library, RegexGen.js, a JavaScript regular expression generator, please give it a try. Comments and issue reports are welcome. Thank you!
RegexGen.js - JavaScript Regular Expression Generator
RegexGen.js is a JavaScript Regular Expression Generator that helps to construct complex regular expressions, inspired by JSVerbalExpressions.
RegexGen.js is basically designed for people who know how the regular expression engine works, but not working with it regularly, i.e., they know how to make the regex works but may not remember every meta-characters that constructs the regex.
RegexGen.js helps people don't have to remember: meta-characters, shortcuts, what characters to escape and tricks about corner cases.
RegexGen.js helps reusing regex patterns. (checkout the [Matching an IP Address] example bellow.)
The Problems
RegexGen.js try to ease two problems.
- While creating a regular expression, it's hard to remember the correct syntax and what characters to escape.
- After done creating a regular expression, it's hard to read and remember what the regex do.
The Goals
RegexGen.js is designed to achieve the following goals.
- The written codes should be easy to read and easy to understand.
- The generated code should be as compact as possible, e.g., no redundant brackets and parentheses.
- No more character escaping reguired (except '\', or if you use regex overwrite.)
- If the generated code is not good enougth, bad parts can be easily replaced directly in the written codes.
Getting Started
The generator is exported as a regexGen() function.
To generate a regular expression, pass sub-expressions as parameters to the regexGen() function.
Sub-expressions as parameters which are separated by comma are concatenated together to form the whole regular expression.
Sub-expressions can either be a string, a number, a RegExp object, or any values generated by the owned functions of the regexGen() function object, i.e., the regex-generator() as the following informal BNF syntax.
Strings passed into the regexGen(), the text(), the maybe(), the anyCharOf() and the anyCharBut() functions, are always escaped as necessary, so you don't have to worry about which characters to escape.
The result of calling the regexGen() function is a RegExp object.
The basic usage can be expressed as the following informal BNF syntax.
RegExp object = regexGen( sub-expression [, sub-expression ...] [, modifier ...] )

sub-expression ::= string | number | RegExp object | term

term ::= regex-generator() [.term-quantifier()] [.term-lookahead()]

regex-generator() ::= regexGen.startOfLine() | regexGen.endOfLine()
    | regexGen.wordBoundary() | regexGen.nonWordBoundary()
    | regexGen.text() | regexGen.maybe() | regexGen.anyChar() | regexGen.anyCharOf() | regexGen.anyCharBut()
    | regexGen.either() | regexGen.group() | regexGen.capture() | regexGen.sameAs()
    | regex() | ... (see regexGen.js for all termGenerator()s.)

term-quantifier() ::= .term-quantifier-generator() [.term-quantifier-modifier()]

term-quantifier-generator() ::= term.any() | term.many() | term.maybe() | term.repeat() | term.multiple()

term-quantifier-modifier() ::= term.greedy() | term.lazy() | term.reluctant()

term-lookahead() ::= term.contains() | term.notContains() | term.followedBy() | term.notFollowedBy()

modifier ::= regexGen.ignoreCase() | regexGen.searchAll() | regexGen.searchMultiLine()
Please check out regexgen.js and wiki for API documentations, and check out test.js for more examples.
2013年12月28日 星期六
整合 Maven 與 Yeoman, 學習筆記(5) - 使用 build-helper-maven-plugin 支援多 src 目錄
使用 build-helper-maven-plugin 支援多 src 目錄
對於一些較複雜的專案, 為了明確區分不同類型的 source code, 要求將它們分別放在專屬的目錄下. 譬如將 model, view, controller 分開來放. Maven 預設的 maven-compiler-plugin 只允許單一 source 目錄, 因此無法支援這樣的設定. 這時候, 就可以利用 build-helper-maven-plugin 來支援多 src 目錄 (不過官方並不推薦使用這種方法):
<!-- multi src dir support -->
<plugin>
    <groupId>org.codehaus.mojo</groupId>
    <artifactId>build-helper-maven-plugin</artifactId>
    <version>1.8</version>
    <executions>
        <execution>
            <id>add-source</id>
            <phase>generate-sources</phase>
            <goals>
              <goal>add-source</goal>
            </goals>
            <configuration>
                <sources>
                    <source>src/main/rs-app/services</source>
                    <source>src/main/rs-app/domain</source>
                    <source>src/main/rs-app/resources</source>
                </sources>
            </configuration>
        </execution>
    </executions>
</plugin>
參考資料:
整合 Maven 與 Yeoman, 學習筆記(4) - tomcat-maven-plugin
支援 Tomcat 啟動
如果偏好使用 Tomcat, 為方便在 deploy 前直接啟動 web app 檢視, 可以在 pom.xml 加入 tomcat-maven-plugin, 引用的版本最好在 properties 區塊定義, 方便更新:
  <properties>
    <tomcat.version>2.2</tomcat.version>
  </properties>

  <build>
    <plugins>
      <!-- Tomcat support -->
      <plugin>
        <groupId>org.apache.tomcat.maven</groupId>
        <artifactId>tomcat7-maven-plugin</artifactId>
        <version>${tomcat.version}</version>
        <configuration>
            <path>/</path>
        </configuration>
      </plugin>
    </plugins>
  <build>
- 跟 Jetty 相反, Tomcat 預設的 web app context 是
/${project.artifactId}, 以此範例來說就是/myapp, 所以最好指定path參數. 參考 Tomcat 文件: Usage. - 全部的 goal 參考 Plugin Documentation.
- 參數: Guide to Configuring Plug-ins. 沒有找到類似 Jetty 的
scanIntervalSeconds參數.
然後, 這樣啟動:
mvn tomcat7:run
相關文章:
- 整合 Maven 與 Yeoman, 學習筆記(1) - node_modules
- 整合 Maven 與 Yeoman, 學習筆記(2) - 使用 mvn archetype:generate 建立 JAX-RS / Jersey 專 案
- 整合 Maven 與 Yeoman, 學習筆記(3) - jetty-maven-plugin
參考資料:
- Tomcat Usage
- Tomcat Plugin Documentation.
- Tomcat Maven Plugin Guide to Configuring Plug-ins
整合 Maven 與 Yeoman, 學習筆記(3) - jetty-maven-plugin
支援 Jetty 啟動
為方便在 deploy 前直接啟動 web app 檢視, 可以在 pom.xml 加入 jetty-maven-plugin, 引用的版本最好在 properties 區塊定義, 方便更新:
  <properties>
    <jetty.version>9.0.6.v20130930</jetty.version>
  </properties>

  <build>
    <plugins>
      <!-- Jetty support -->
      <plugin>
        <groupId>org.eclipse.jetty</groupId>
        <artifactId>jetty-maven-plugin</artifactId>
        <version>${jetty.version}</version>
        <configuration>
          <scanIntervalSeconds>10</scanIntervalSeconds>
          <webApp>
            <contextPath>/</contextPath>
          </webApp>
        </configuration>
      </plugin>
    </plugins>
  <build>
這裡使用 scanIntervalSeconds 參數啟動自動掃描, 方便修改時自動重新載入.contextPath 則是指定 web app context, / 就是預設值, 所以可以省略, 此時 app 在 http://localhost:8080/ 啟動.
若指定為 /myapp, 則 app 在 http://localhost:8080/myapp/ 啟動.
啟動指令:
mvn jetty:run
jetty:run goal 會自動觸發 build 階段, 不過若專案有經過大修改(譬如更動 class, method 名稱), 最好先 clean 再執行.
相關文章:
- 整合 Maven 與 Yeoman, 學習筆記(1) - node_modules
- 整合 Maven 與 Yeoman, 學習筆記(2) - 使用 mvn archetype:generate 建立 JAX-RS / Jersey 專案
- 整合 Maven 與 Yeoman, 學習筆記(4) - tomcat-maven-plugin
參考文章:
- Jetty Maven Plugin Configuring the Jetty Maven Plugin
- Jetty Maven Plugin Jetty : The Definitive Reference
2013年12月27日 星期五
整合 Maven 與 Yeoman, 學習筆記(2) - 使用 mvn archetype:generate 建立 JAX-RS / Jersey 專案
建立整合專案時, 可以使用 Maven 的 template 機制, 建立需要的專案架構. 這時候可以執行 mvn archetype:generate 指令, 從中選取適合的範本. 執行該指令時, 若不指定 filter 或 archetypeGroupId 及 archetypeArtifactId 參數, 會進入 interactive mode, Maven 會列出在中央倉庫中所有的 archetypes, 目前有 800 多個範本可選.
建立 JAX-RS / Jersey 專案
根據 Jersey - Download 的說明, 可以執行 mvn archetype:generate 指令:
  mvn archetype:generate \
            -DarchetypeGroupId=org.glassfish.jersey.archetypes \
            -DarchetypeArtifactId=jersey-quickstart-webapp \
            -DarchetypeVersion=2.5
快速建立 jax-rs web app. 由於省略 -DarchetypeVersion=2.5 參數時, Maven 會自動選擇最新的版本, 所以其實只需要這樣:
  mvn archetype:generate \
            -DarchetypeGroupId=org.glassfish.jersey.archetypes \
            -DarchetypeArtifactId=jersey-quickstart-webapp
若是不想進入互動模式, 也可以直接指定 groupId, artifactId, version, package 參數, 然後指定 -DinteractiveMode=false 參數, 進入 batch mode, 譬如:
  mvn archetype:generate \
            -DarchetypeGroupId=org.glassfish.jersey.archetypes \
            -DarchetypeArtifactId=jersey-quickstart-webapp \
            -DgroupId=com.github.myapp \
            -DartifactId=myapp \
            -Dversion=1.0.0-SNAPSHOT \
            -Dpackage=com.github.myapp \
            -DinteractiveMode=false
自行建立 archetype
若經常需要重複建立類似的專案, 也可以考慮自行建立 archetype. 等有空的時候再來試試看.
參考文件: Guide to Creating Archetypes.
後記
Yeoman 的 GETTING STARTED WITH YEOMAN 文件上說:
On Windows, we suggest you use an improved command line tool such as Console2 or PowerShell to improve the experience.
但我使用 Windows PowerShell 來執行指令:
  mvn archetype:generate
            -DarchetypeGroupId=com.sun.jersey.archetypes
            -DarchetypeArtifactId=jersey-quickstart-webapp
會出現錯誤訊息:
The goal you specified requires a project to execute but there is no POM in this directory
後來發現把參數用引號刮起來, 像這樣:
  mvn archetype:generate
            "-DarchetypeGroupId=com.sun.jersey.archetypes"
            "-DarchetypeArtifactId=jersey-quickstart-webapp"
才能正確執行. 由於不熟 PowerShell, 暫時還不清楚原因. 目前還是使用 cmd 來建置專案.
歡迎大家的回饋與心得分享.
相關文章:
- 整合 Maven 與 Yeoman, 學習筆記(1) - node_modules
- 整合 Maven 與 Yeoman, 學習筆記(3) - jetty-maven-plugin
- 整合 Maven 與 Yeoman, 學習筆記(4) - tomcat-maven-plugin
參考文章:
- Maven Project creation
- Maven Introduction to Archetypes
- Maven archetype:generate
- Maven Guide to Creating Archetypes
- Jersey Jersey - Download
- Jersey Chapter 2. Modules and dependencies
- Yeoman GETTING STARTED WITH YEOMAN
2013年12月18日 星期三
整合 Maven 與 Yeoman, 學習筆記(1) - node_modules
如同 Java 可以使用 Maven 來幫助專案開發自動化, 管理程式庫的依賴關係及下載等瑣碎的維護問題, 使用 Yeoman(Yo/Bower/Grunt) 可以輔助 Web Front-End 自動化開發, 減少人工勞動容易發生的失誤.
這一系列筆記, 將記錄整合及學習 Maven / Yeoman 的過程中所遇到的各種問題, 疑惑, 注意事項及各種使用到的附加元件. 目標是整合 Maven 及 Yeoman, 建構從 Back-End 到 Front-End 一致的自動化專案建構架構.
這一篇記錄的, 是關於 node 模組依賴關係的問題.
2013年11月27日 星期三
GTD - Getting Things Done - Principle and Practice 原理與實踐
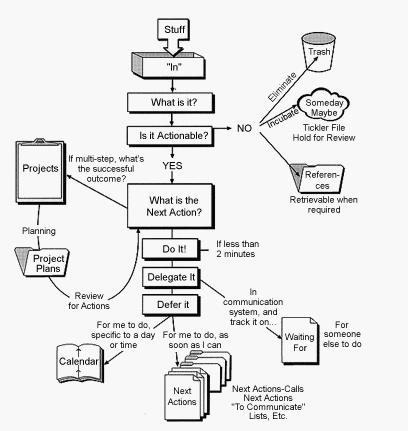
簡介
本文是個人學習『GTD (Getting Things Done) 時間管理』的體會與心得整理。
2013年11月11日 星期一

2013年5月28日 星期二
2012年7月22日 星期日
Differential backup using 7-Zip for Windows (Part 2) - Secrets of batch files - 利用 7-Zip 進行差異備份(下篇) - 批次檔案的秘密
簡介
在上一篇文章「Differential backup using 7-Zip for Windows (Part 1) - 利用 7-Zip 進行差異備份(上篇)」中,介紹了如何利用 Open Source 軟體 7-Zip 壓縮程式,來進行差異備份。並使用 Windows/DOS 的 cmd batch 批次檔案,自動為備份檔名附加日期時間戳記。本文將繼續說明在撰寫 cmd batch 批次指令時,遇到的各種問題(陷阱)與解決方法。
2012年7月20日 星期五
Differential backup using 7-Zip for Windows (Part 1) - 利用 7-Zip 進行差異備份(上篇)
2012年6月5日 星期二
Android (rooted) - Convert system apps to user apps, or reverse - 把系統應用程式轉成使用者應用程式,或相反
簡介
本文適合手機已經 rooted 的使用者。介紹如何手動將系統應用程式轉換成使用者應用程式,或者相反地,將使用者應用程式轉換成系統應用程式。
訂閱:
文章 (Atom)